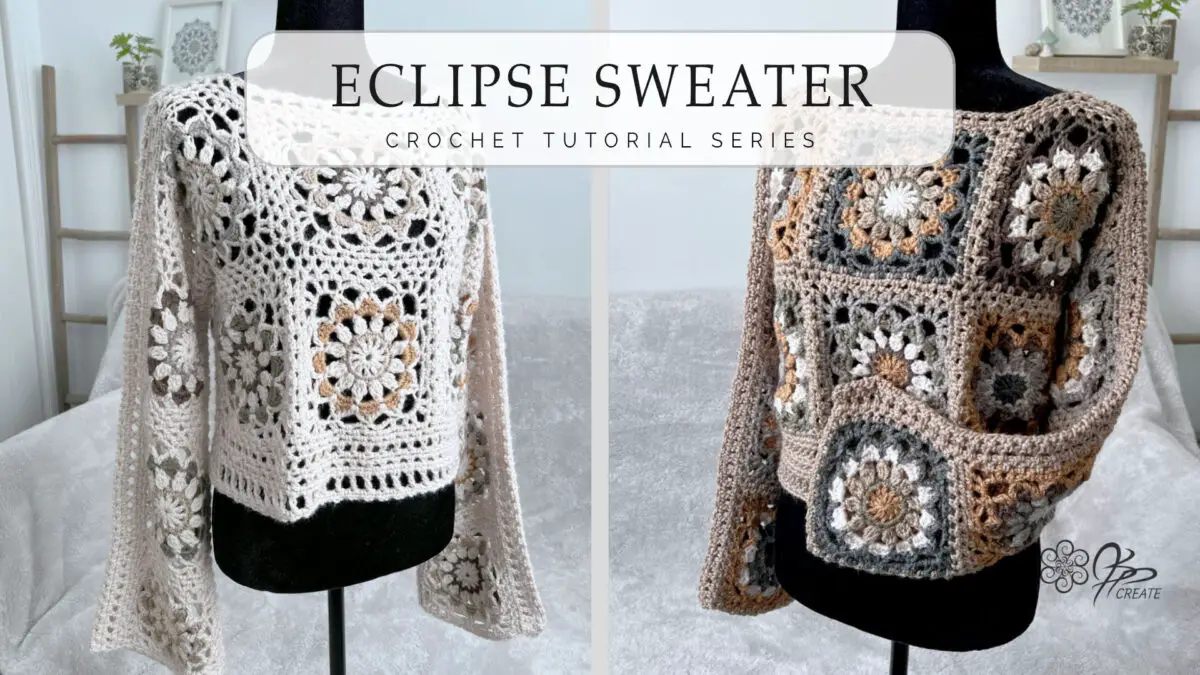
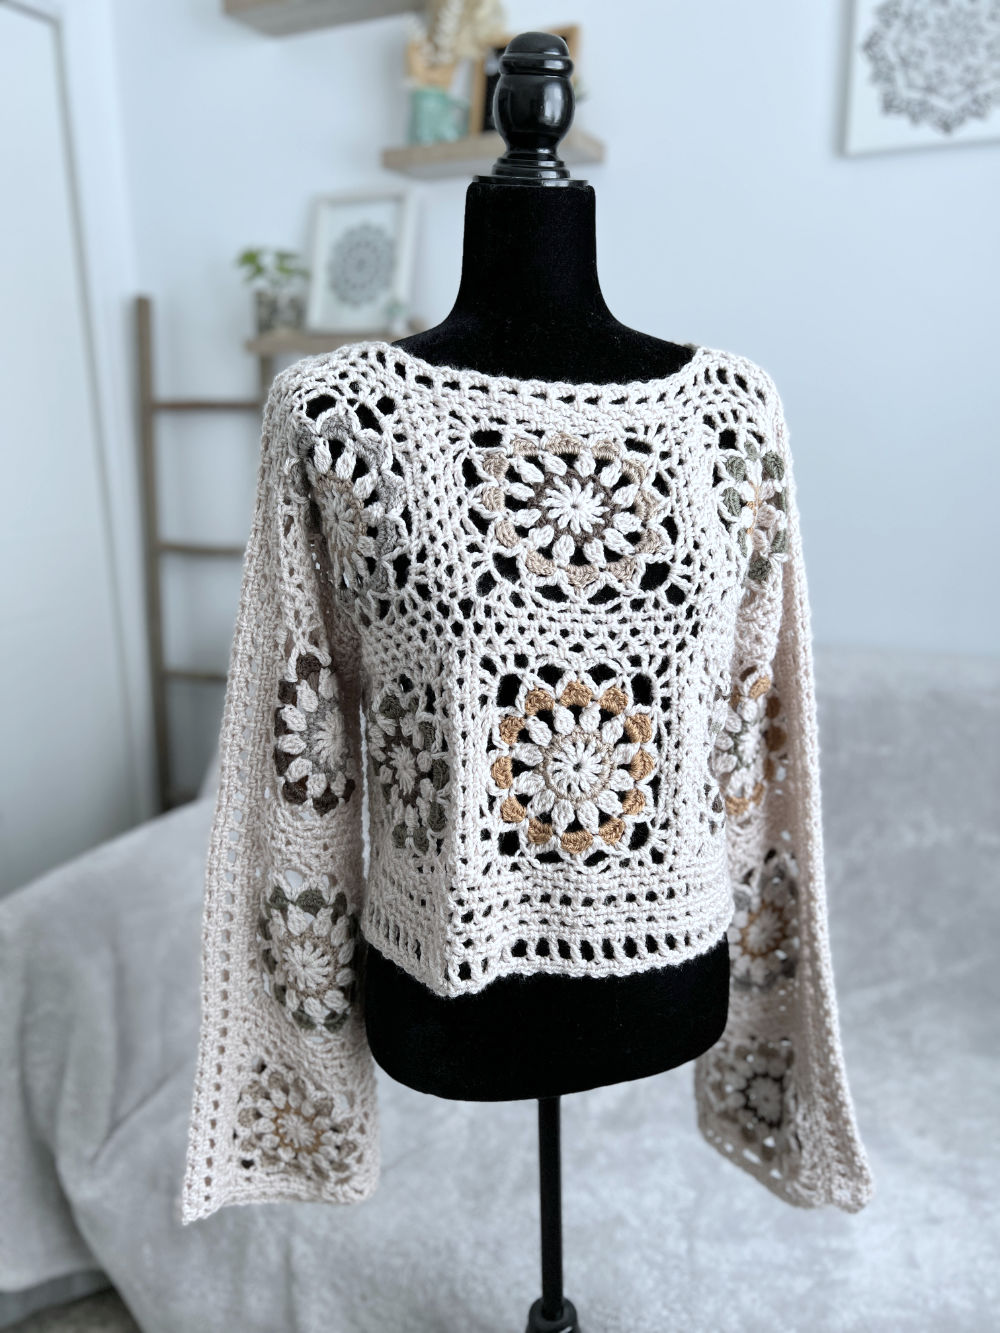
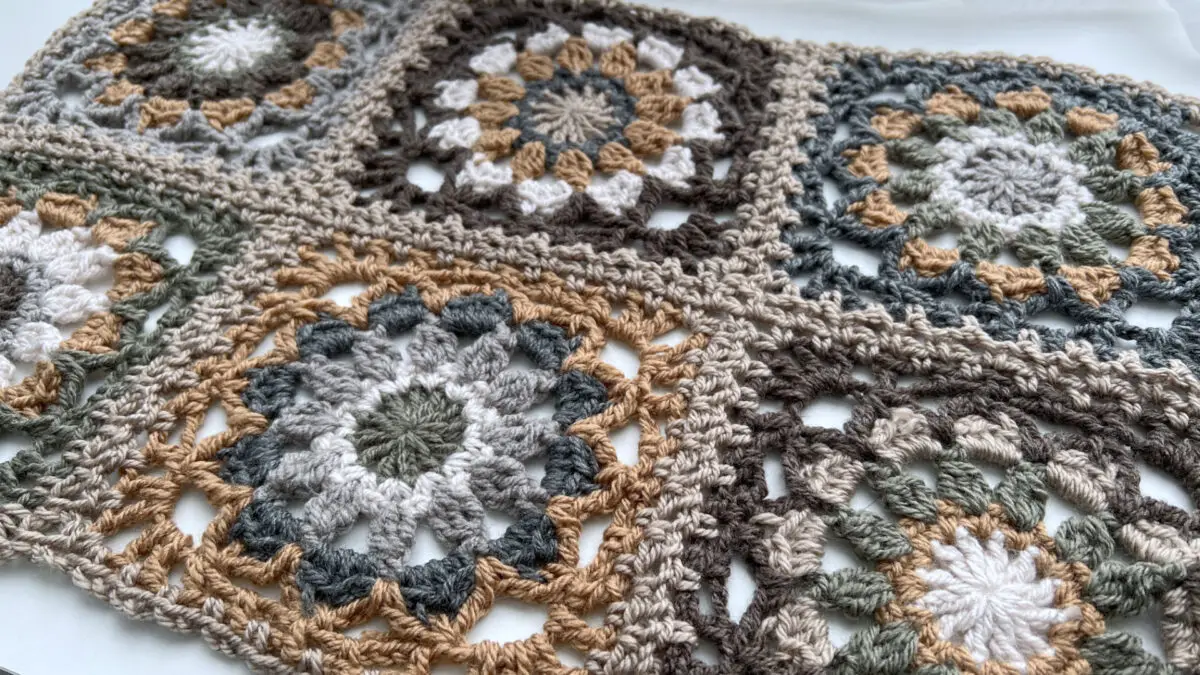
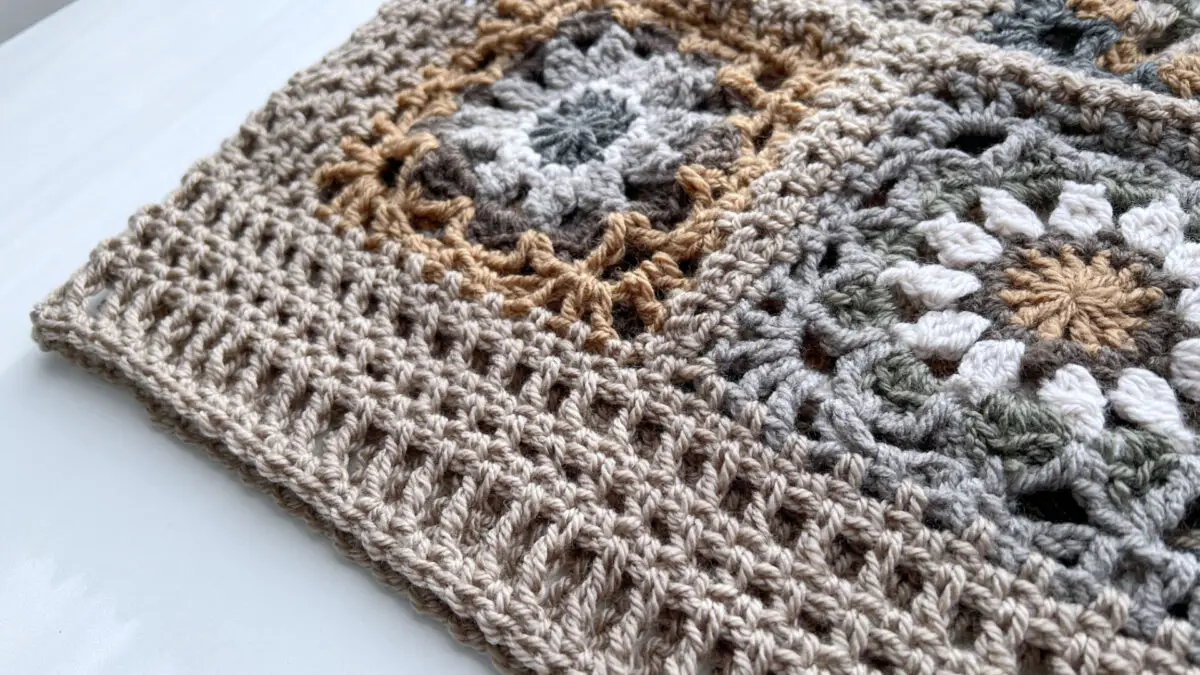
Today, we’re kicking off an exciting new video tutorial series where I’ll guide you through the techniques for making my Eclipse Sweater! Designed with a lightweight DK yarn, the Eclipse Sweater has a delicate, flowing style that beautifully blends vintage charm with a modern touch. It’s created using my Eclipse Square, featuring airy, openwork stitches that give it an effortless drape. The lightness of the fabric makes it perfect for warm summer days, or for layering on cooler evenings — providing just the right amount of warmth without feeling too heavy. Each square showcases a unique mix of colours, creating a stunning patchwork effect that adds depth and personality to the design.
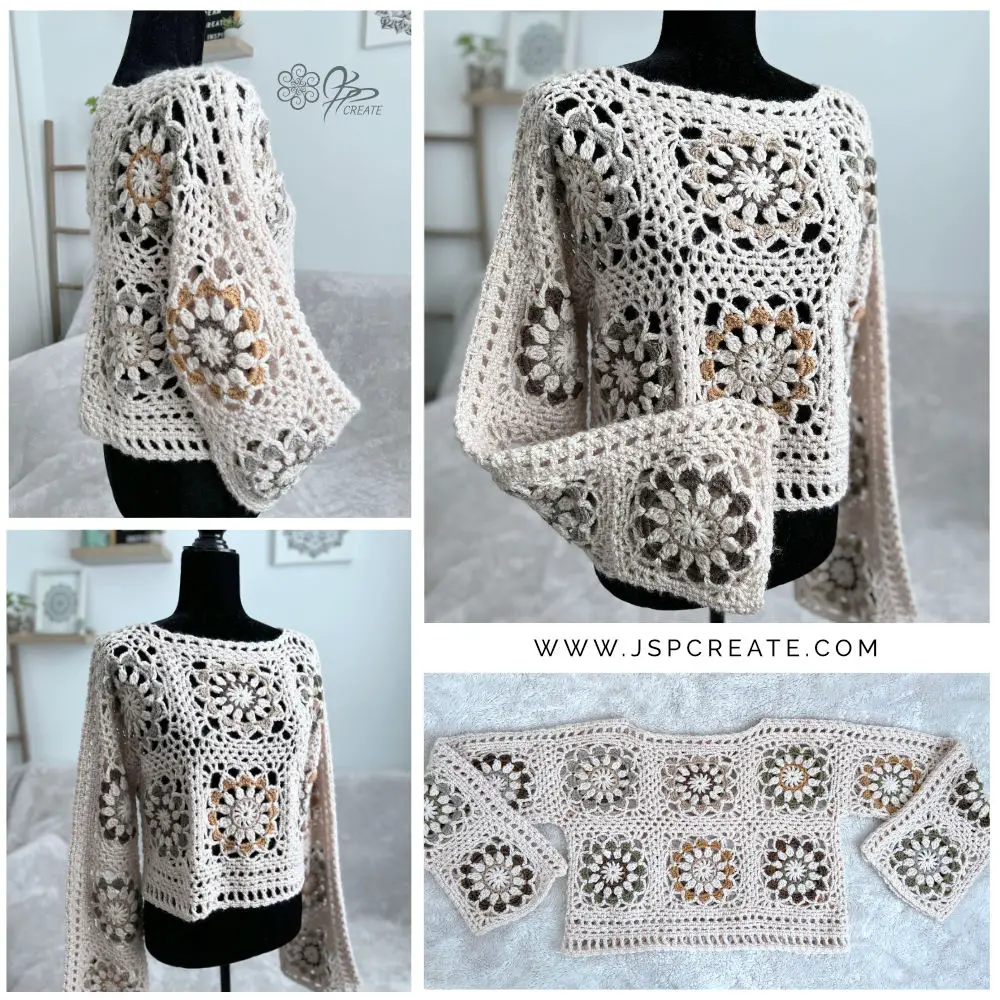
In the first tutorial of this Eclipse Sweater video series, I’ll be showing you how to use the join-as-you-go method to seamlessly connect the squares for a polished, professional finish. In the second video, I will be sharing how to assemble the pieces and work extra crocheted panels onto your pieces, to accommodate all 6 sizes and finish off our sweater.
Stylish yet comfortable, this sweater is an easy-to-wear piece that pairs just as well with jeans as it does over a dress. And the best part? I’ll walk you through every step, so you can create your own one-of-a-kind version!
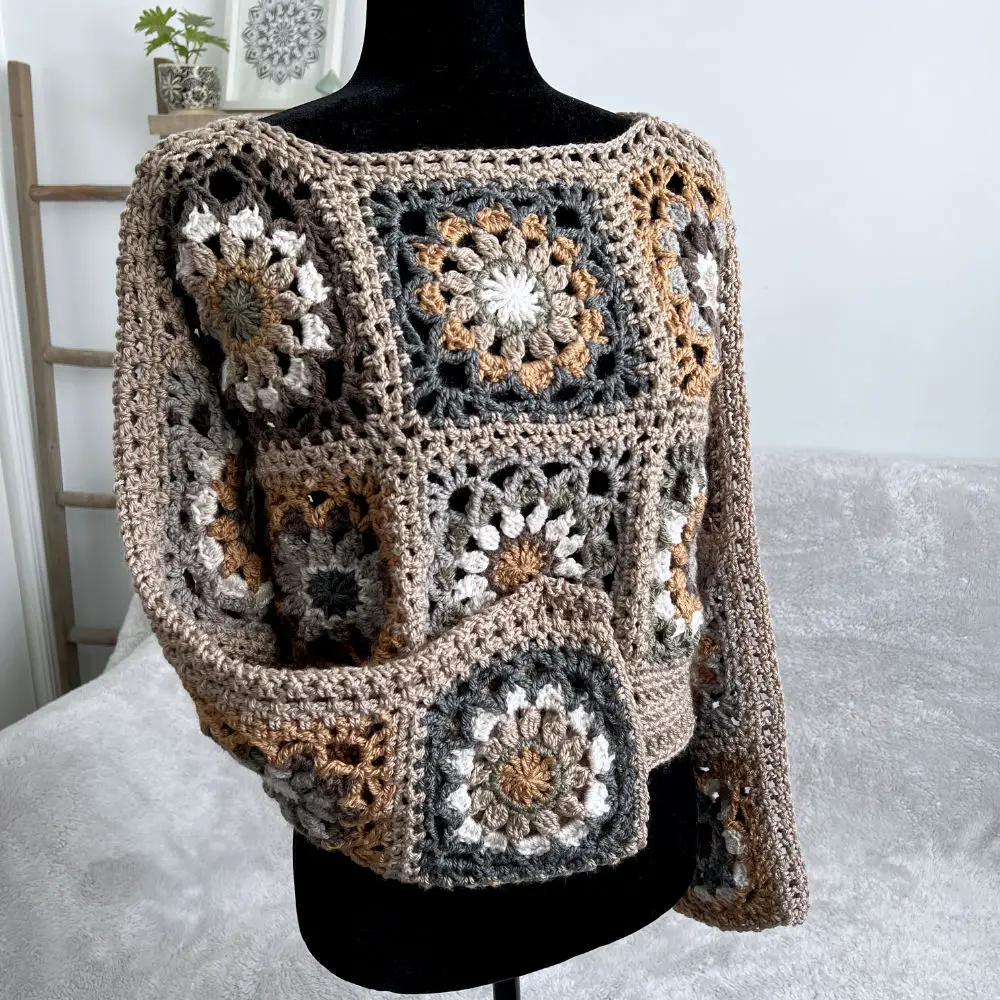
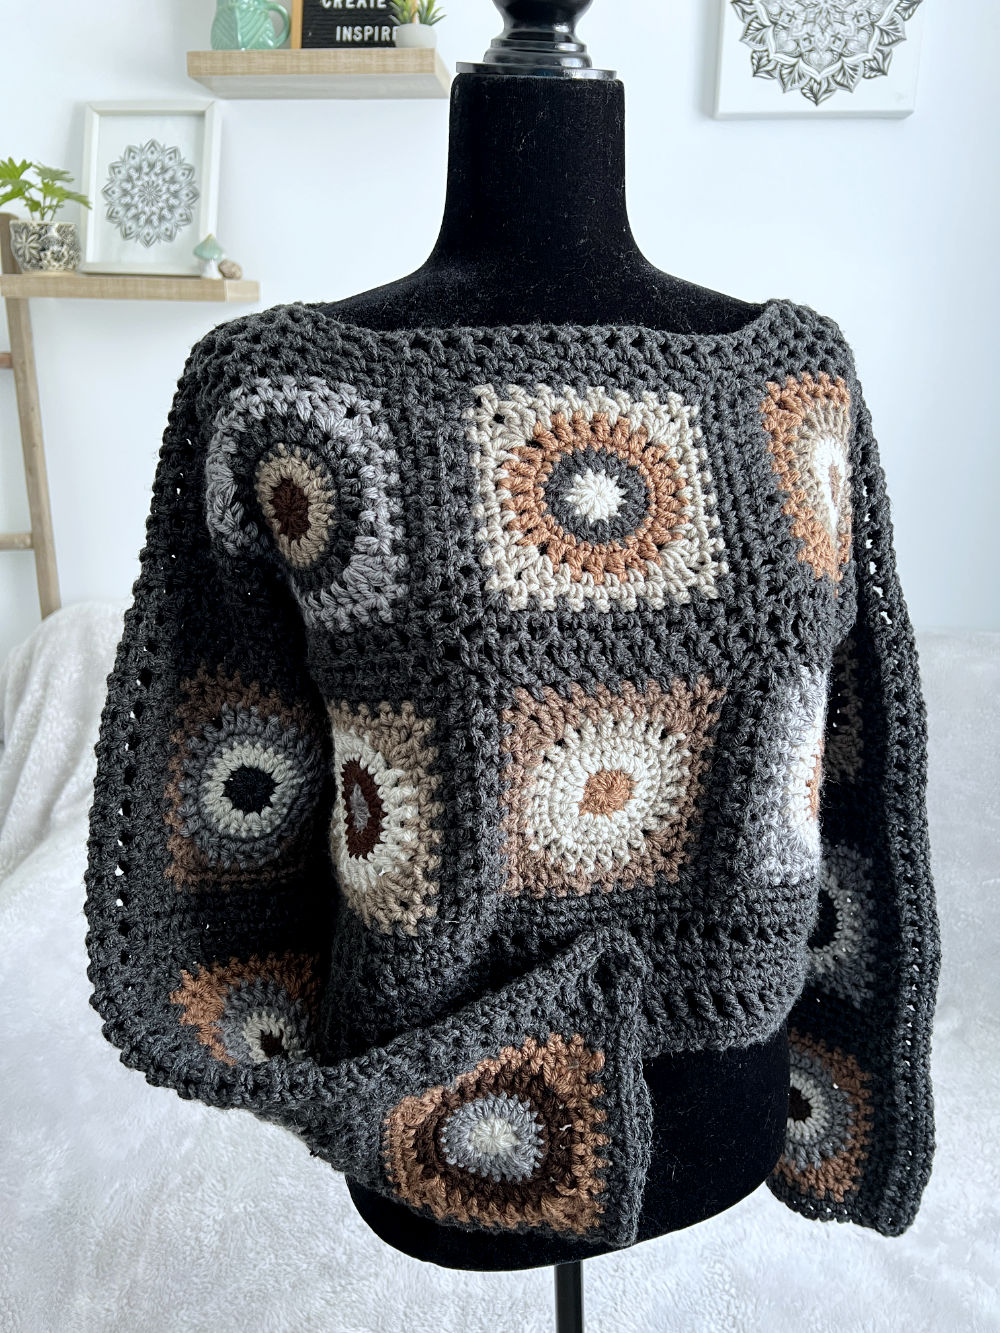
The assembly techniques I’ll be showing you for the Eclipse Sweater can also be used with other granny squares as well. To keep with the sizing for this particular design the square should measure approximately 5¾”, but if you prefer a more oversized fit, you can opt for a larger square. I’ve also used these same techniques with my Summer Side Square to create this sweater with great results. In that version, I used a worsted weight yarn, which produced a thicker fabric with a cozy feel. The square measured 6 inches and had a more solid stitch pattern, making it perfect for a warm and comfortable sweater for cooler weather.
Eclipse Sweater Sizing
Sweater Sizing is for S [ M, L, XL, 2XL, 3XL ]
Bust: 38 [ 42, 46, 50, 54, 58 ] inches
Length of Back: 15 ½ [ 15 ½, 16 ½, 17, 18, 18 ] inches
Fit is a loose flowing garment with a cropped length. Length can be adjusted in Lower Body Panel Section
Supplies
Crochet Hook:
Size G / 7 / 4.5 mm crochet hook or size needed to obtain gauge
Notions:
Split Stitch Markers ( paper clips will work )
Scissors
Darning Needle
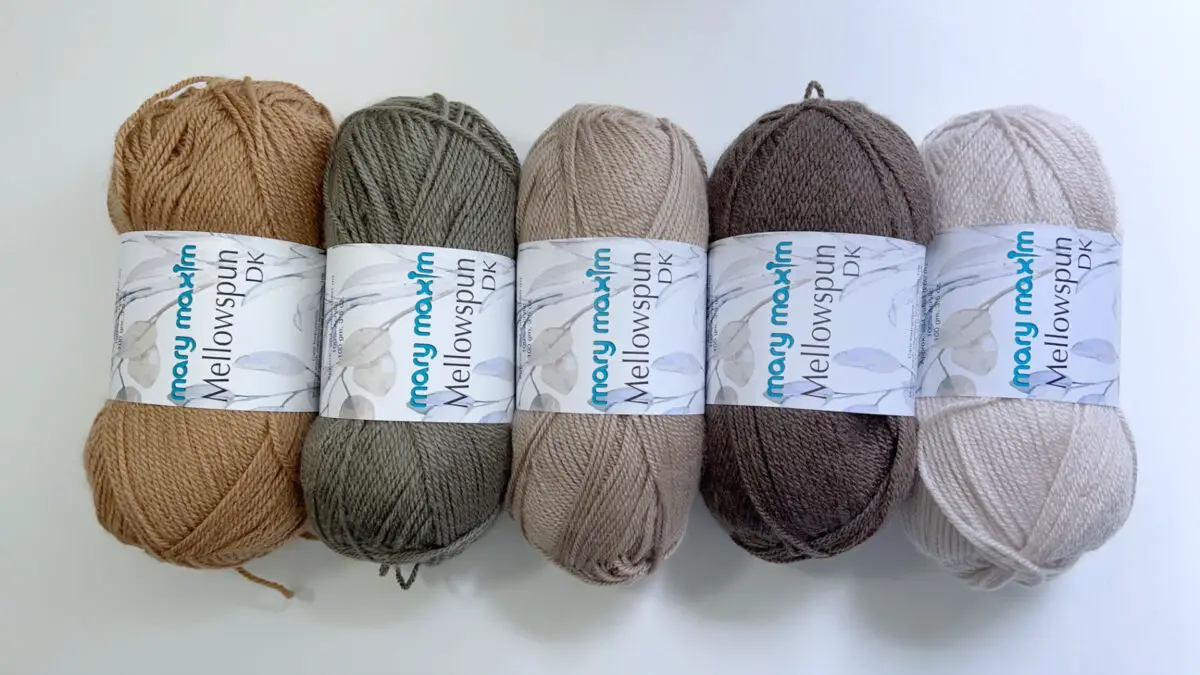
Yarn
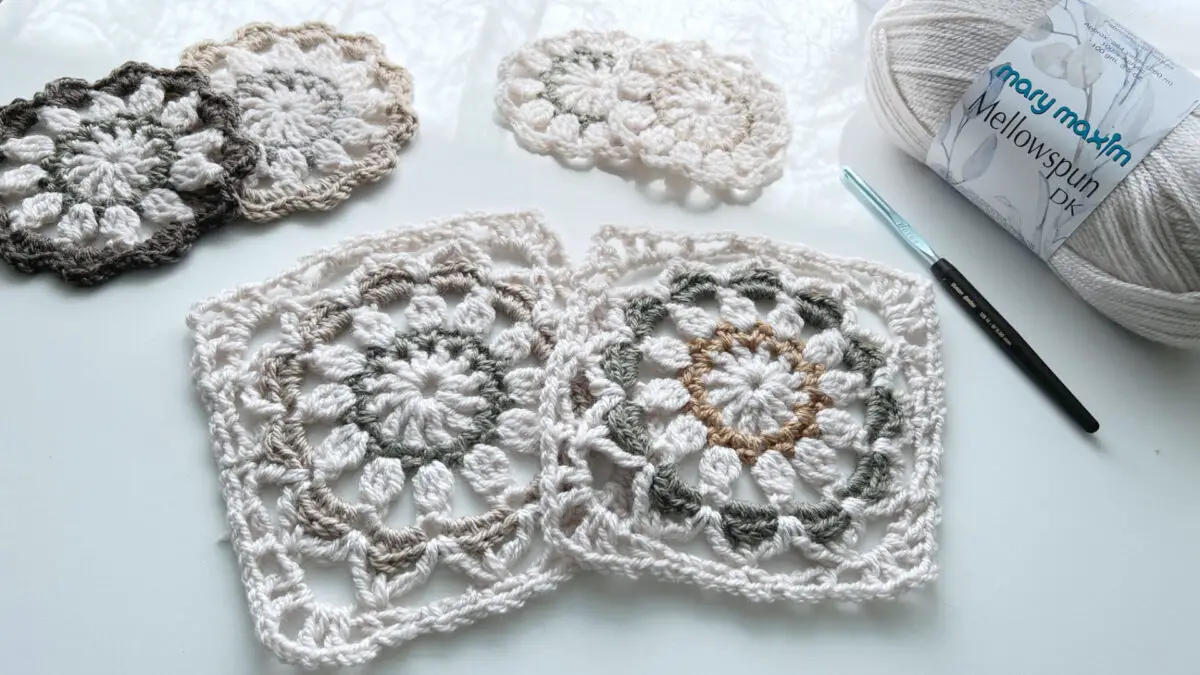
Mary Maxim Mellowspun DK weight size #3 – 3.5 oz / 100 g – 284 yds / 260 m
Eclipse Sweater Colour Way Version 1
A – 3 [ 3, 4, 4, 5, 5 ] balls – Buff
B – 1 ball – Mink
C – 1 ball – Taupe
D – 1 ball – Nutmeg
E – 1 ball – Spruce
F – 1 ball – Dark Oak
Eclipse Sweater Colour Way Version 2
A – 2 [ 2, 3, 3, 4, 4 ] balls – Taupe
B – 1 ball – Mink
C – 1 ball – Buff
D – 1 ball – Nutmeg
E – 1 ball – Spruce
F – 1 ball – Dark Oak
G – 1 ball – Slate
Gauge:
Eclipse Sq Motif = 5.75” x 5.75″ / 15 cm x 15 cm
Border Stitch = 16 sts and 8 rws to 4″ / 10 cm
Get The PDF Pattern for the Eclipse Sweater In My Shop Here
More Information on Hooks Sizes, Yarn Weights and Crochet Language
Hook Sizes see the Craft Yarn Council’s Page Here
For Standard Yarn Weight Information See this Page
A Handy PDF from Annie’s on the difference between UK and US Crochet Terms
A Nice Explanation from LoveCraft’s on The UK and US differences
Abbreviations:
ch – chain
st(s)– stitch(es)
sl st – slip stitch
sc – single crochet
sc blo – single crochet back loop only
hdc – half double crochet
dc – double crochet
tr – treble crochet
lp(s) – loop(s)
yo– yarn over
rnd – round
beg – beginning
prev – previous
sp – space
sk – skip
rep – repeat
dec – decrease
Cont – continue
yo – yarn over
lp(s) – loop(s)
RS – Right Side of work
WS – Wrong Side of work
RS ( WS ) Facing – Right Side ( Wrong Side ) of work is facing you
WS Together – Wrong Side of both pieces will be facing each other
Special Stitches:
Beg DC CL – Beginning Double Crochet Cluster : ch 2, [ yo, insert hook into same ch-sp, pull up a lp, yo, pull through two lps on hook, ] 2 times, yo pull through rem three lps on hook
DC CL – Double Crochet Cluster : [ yo, insert hook into ch-sp and pull up a lp, yo and pull through two lps on hook ] 3 times into same ch-sp, then yo, pull through rem four lps on hook.
Beg TR DEC – Beginning Treble Decrease with sc : ch 4, [ insert hook into back bump of center dc { loop sitting behind the two top loops of the stitch }, yo, pull up a lp, leave two loops on hook, yo twice, insert hook into next ch-1 sp, yo, pull up a loop, yo, pull through two lps, yo, pull through two lps, yo pull through rem 3 lps on hook
TR DEC – Treble Decrease with sc : yo twice, insert hook into ch-1 sp { same ch-sp as prev tr } yo pull up a loop, yo, pull through two loops, yo, pull through two lps, leave rem 2 lps on hook, insert hook into back bump of center dc { loop sitting behind the two top loops of the stitch }, yo, pull up a lp, leave 3 loops on hook, yo twice, insert hook into next ch-1 sp, yo, pull up a lp, yo, pull through two lps, yo, pull through two lps, yo, pull through rem 4 lps on hook
Sc in Back Bump of Stitch: looking down from the top at the V shape the stitch top makes, behind this there lies a strand “bump” that stands out, this is the what you will work a regular sc into. See Video Tutorial for Eclipse Square #2 For a full explanation
Panel Stitch ( For Gauge Test ): ( multiple of 2 + 1 sts )
in pattern this is worked over a prev row of sc, ch-sp
For Gauge Test, chain an odd number of stitches
Row 1 : hdc in 4th chain from hook { first 3 ch’s count as first hdc and ch 1 } ch 1, sk next ch, ( hdc in next ch, ch 1, sk next ch ) across to last 2 ch, hdc in each of last 2 ch, turn
Row 2 : ch 3 { counts as first hdc and ch-1 sp }, sk next st, ( hdc in next ch-sp, ch 1 ) across to last ch-sp, 2 hdc in last ch-sp, turn
Repeat Row 2 for Panel Stitch
Eclipse Square Motif Instructions
Video Tutorials for the Eclipse Square – 3 Part Series Here
Foundation: With First Col, make a Magic Ring,
Or alternative – make a sl knot on hook and ch 6, sl st in first ch to form a ring,
Rnd 1: Cont with Same Col, ch 4 { counts as first dc and ch 1 }, ( dc in foundation ring, ch 1 ) 11 times, sl st in 3rd ch of beg ch 4, fasten off. { 12 dc, 12 ch-1 sp }
Rnd 2: Join Next Col with a sc in any ch-1 sp of prev rnd, ch 2, sc in same ch-sp, [ ( sc, ch 2, sc ) in next ch-sp ] 11 times, sl st in first sc of rnd, fasten off. { 24 sc, 12 ch-2 sp }
Rnd 3: Join Next Col with a sl st in any ch-2 sp of prev rnd, work a Beg DC CL in same ch-sp as join, ch 4, ( DC CL in next ch-sp, ch 4 ) 11 times, sl st in top of Beg DC CL of rnd, fasten off. { 12 DC CL, 12 ch-4 sp }
Rnd 4: Join Next Col with a sc in any ch-4 sp of prev rnd, ( hdc, dc, hdc, sc ) in same ch-4 sp, ch 1, [ ( sc, hdc, dc, hdc, sc ) in next ch-4 sp, ch 1 ] 11 times, sl st in first sc of rnd, fasten off. { 24 sc, 24 hdc, 12 dc, 12 ch-1 sp }
Rnd 5: Join Next Col with a sl st in any ch-1 sp of prev rnd, work a Beg TR DEC stitch, ch 5, ( TR DEC, ch 5 ) 11 times, sl st in top st of Beg TR DEC. { 12 TR DEC, 12 ch-5 sp }
Rnd 6: Cont with Same Col, ch 1, sc in the top of Beg TR DEC stitch of prev rnd, * ch 2, sc in next ch-5 sp, ch 2, hdc in next stitch { top of TR DEC from prev rnd }, ch 2, ( dc, ch 1, dc, ch 3, dc, ch 1, dc ) in next ch-5 sp, ch 2, hdc in next st, ch 2, sc in next ch-5 sp, ch 2, ** sc in next st, rep from * 2 more times, then from * to ** once more, sl st in first sc of rnd. Fasten Off.
{ 12 sc, 8 hdc, 16 dc, 8 ch-1 sp, 24 ch-2 sp, 4 ch-3 sp }
Eclipse Sweater Instructions:
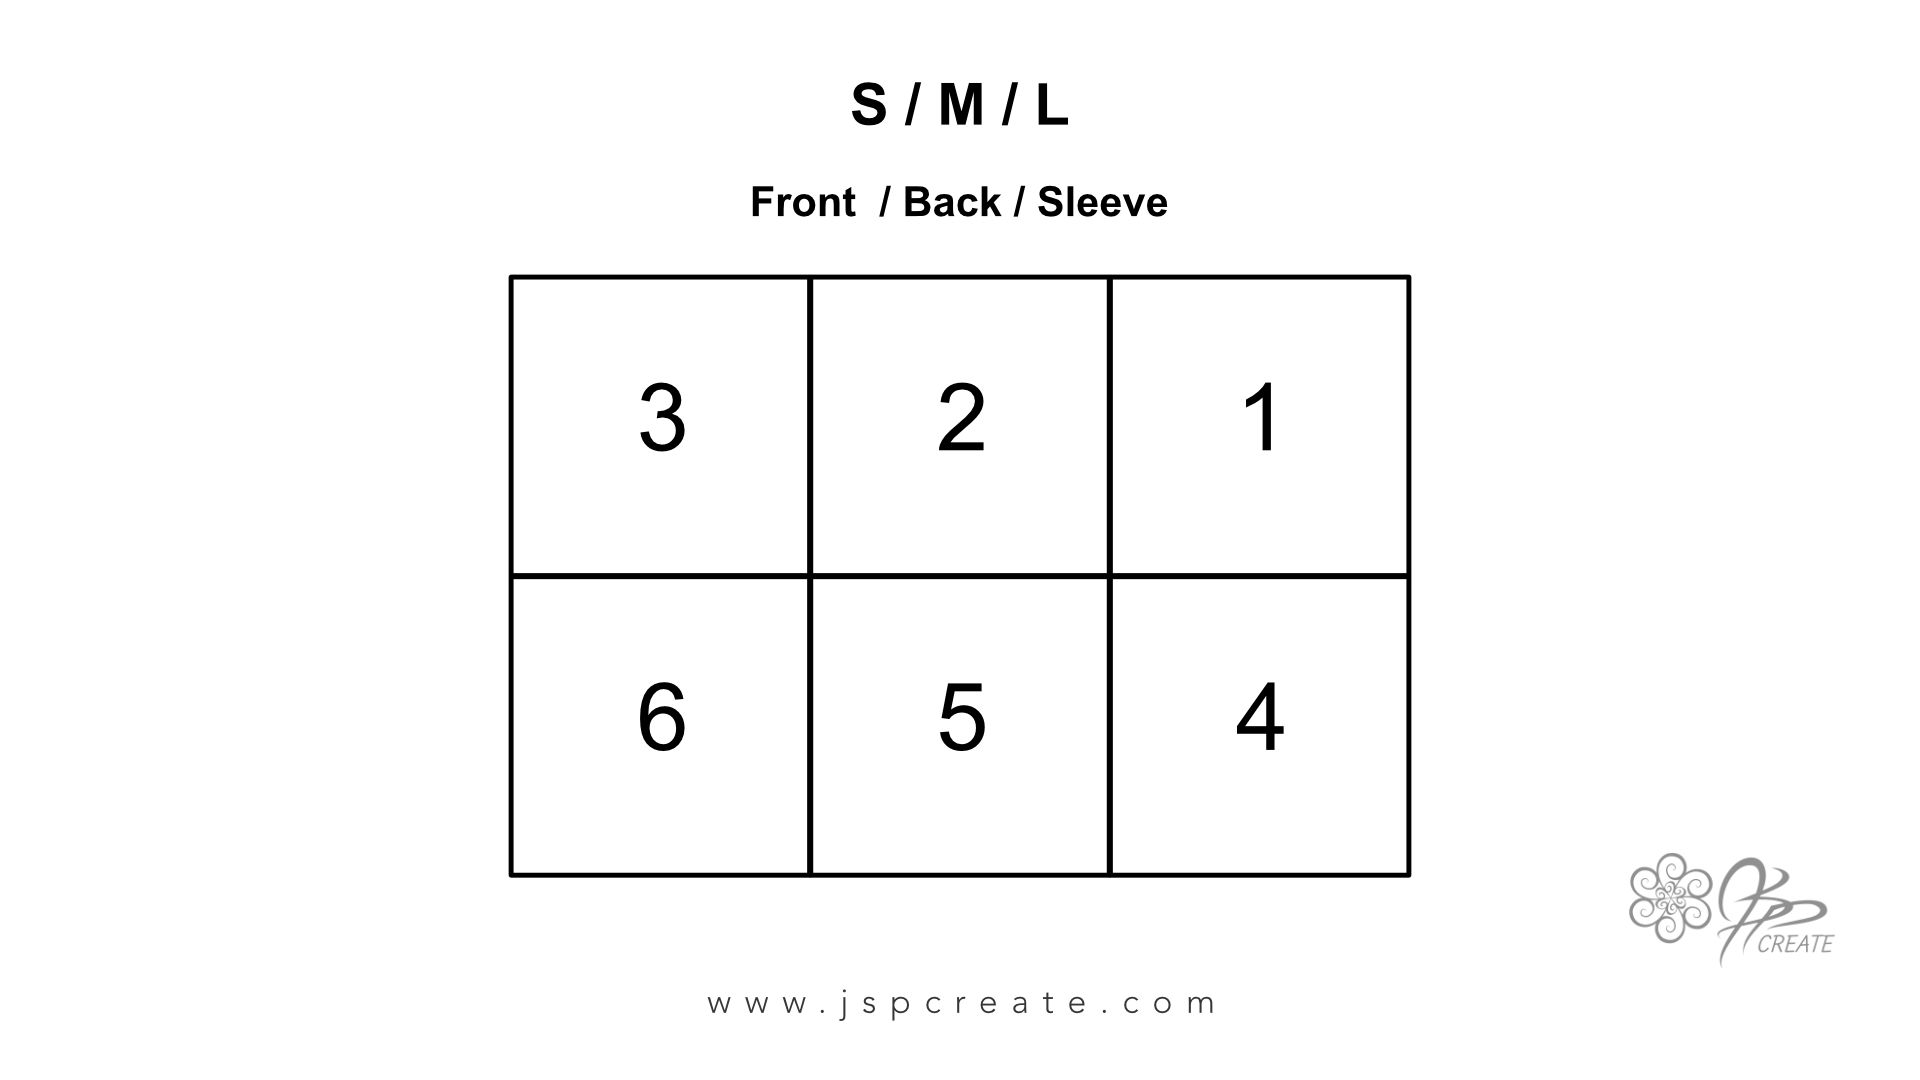
S / M / L Only
6 Sqs for Back, 6 Sqs for Front, 6 Sqs for Each Sleeve = 24 Sqs
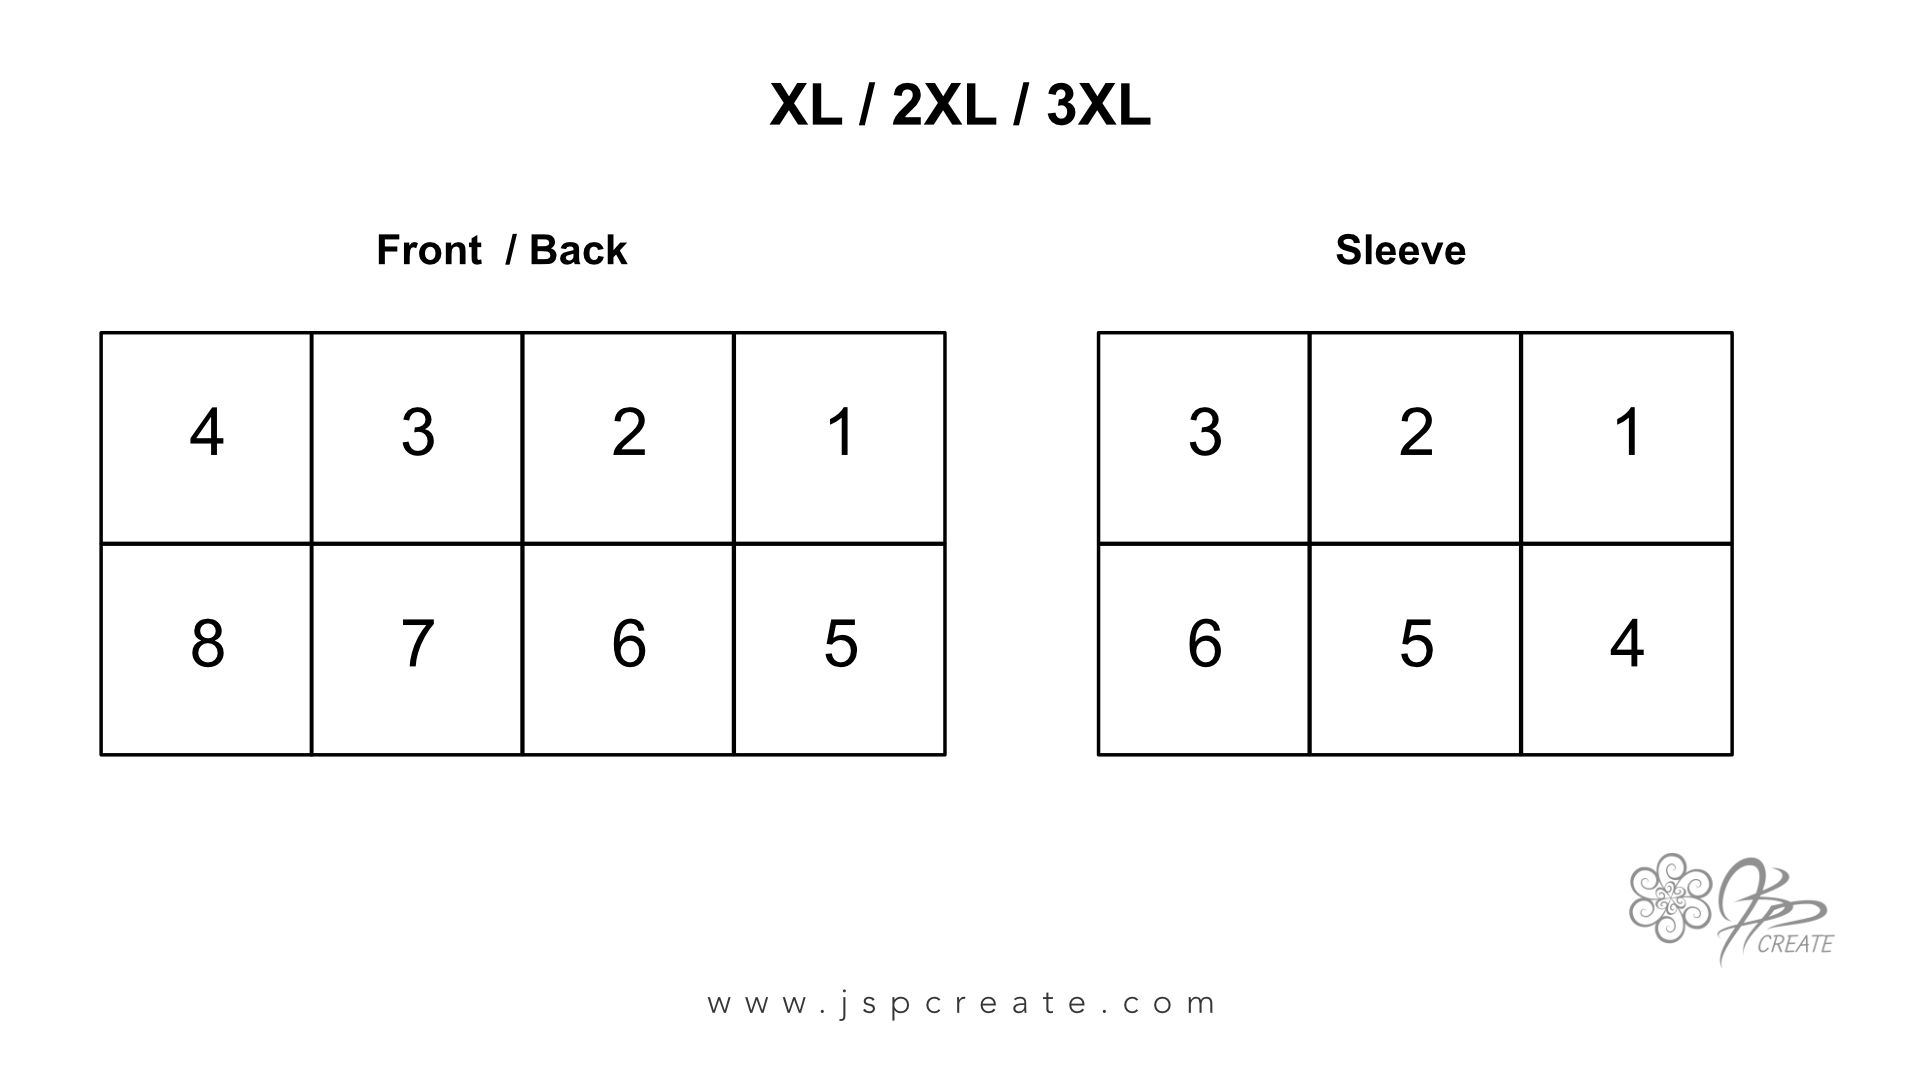
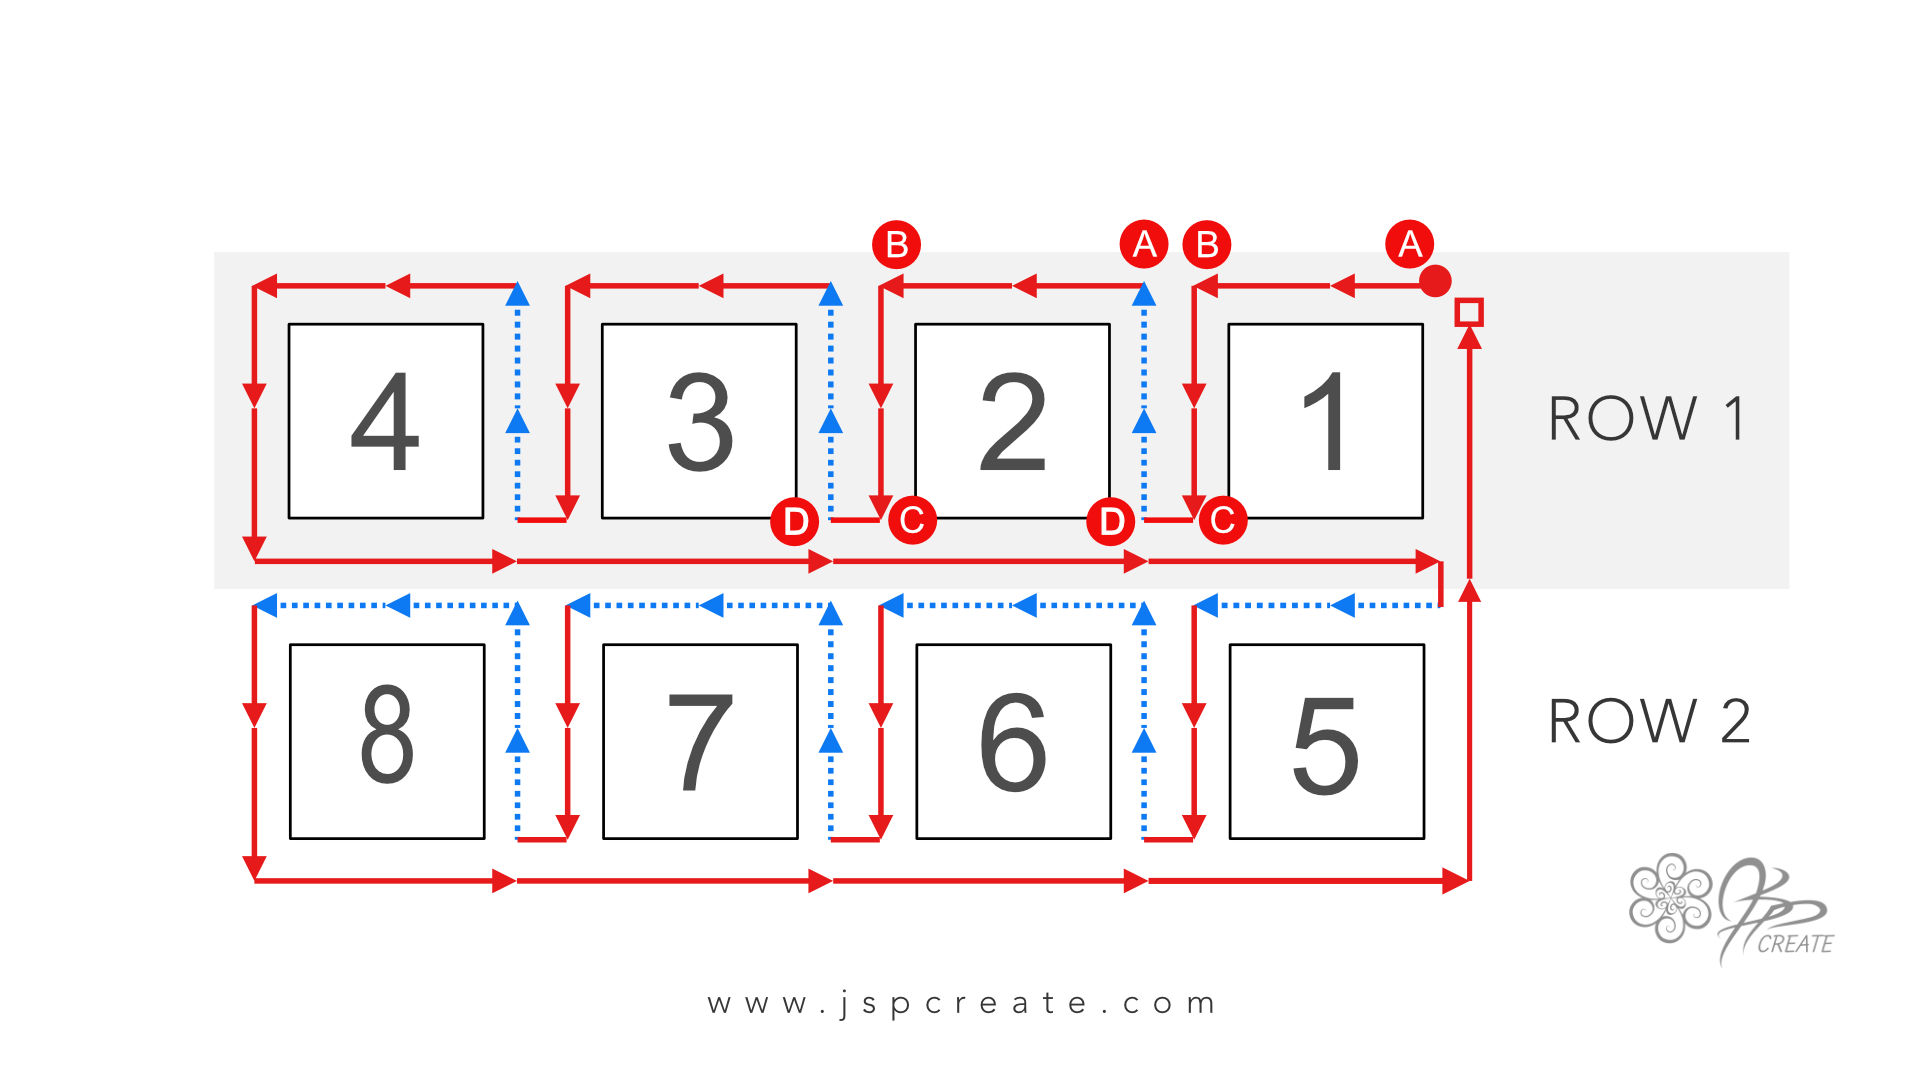
XL / 2XL / 3XL Only
8 Sqs for Back, 8 Sqs for Front, 6 Sqs for Each Sleeve = 28 Sqs
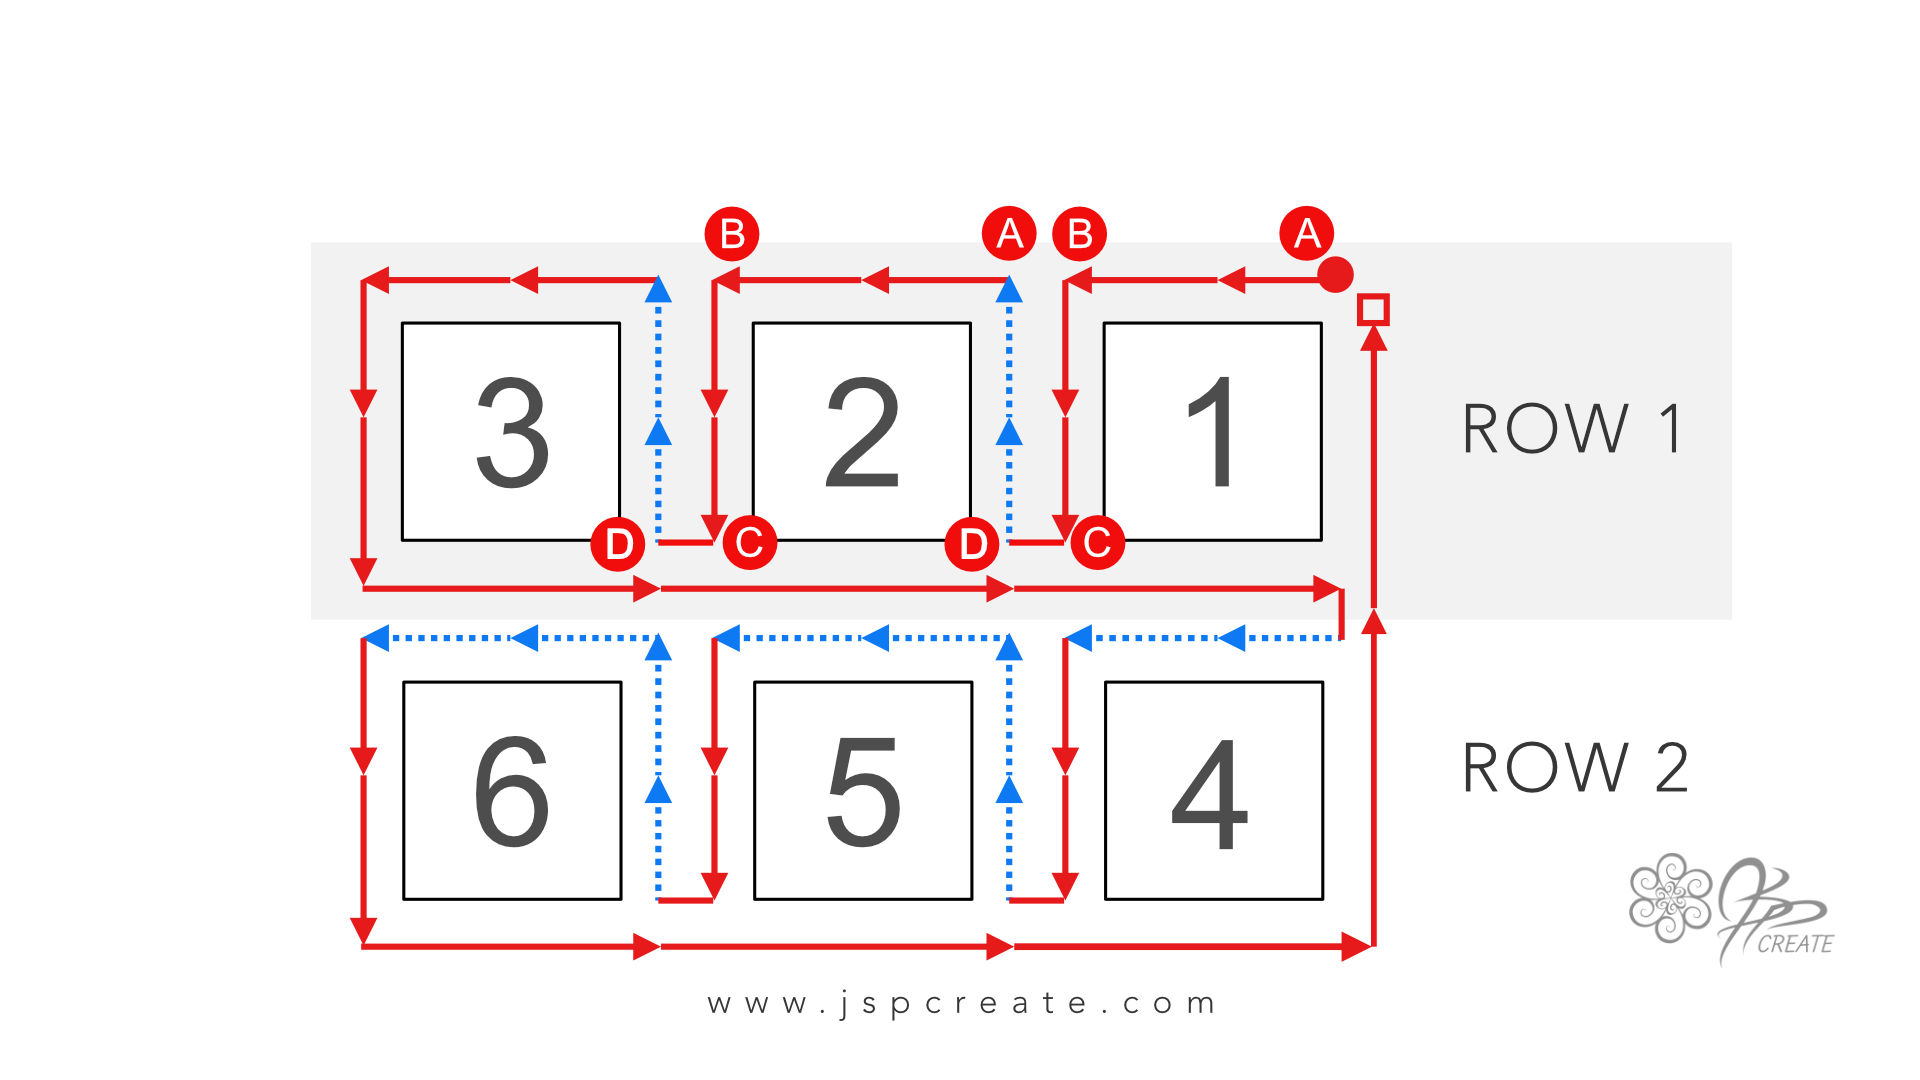
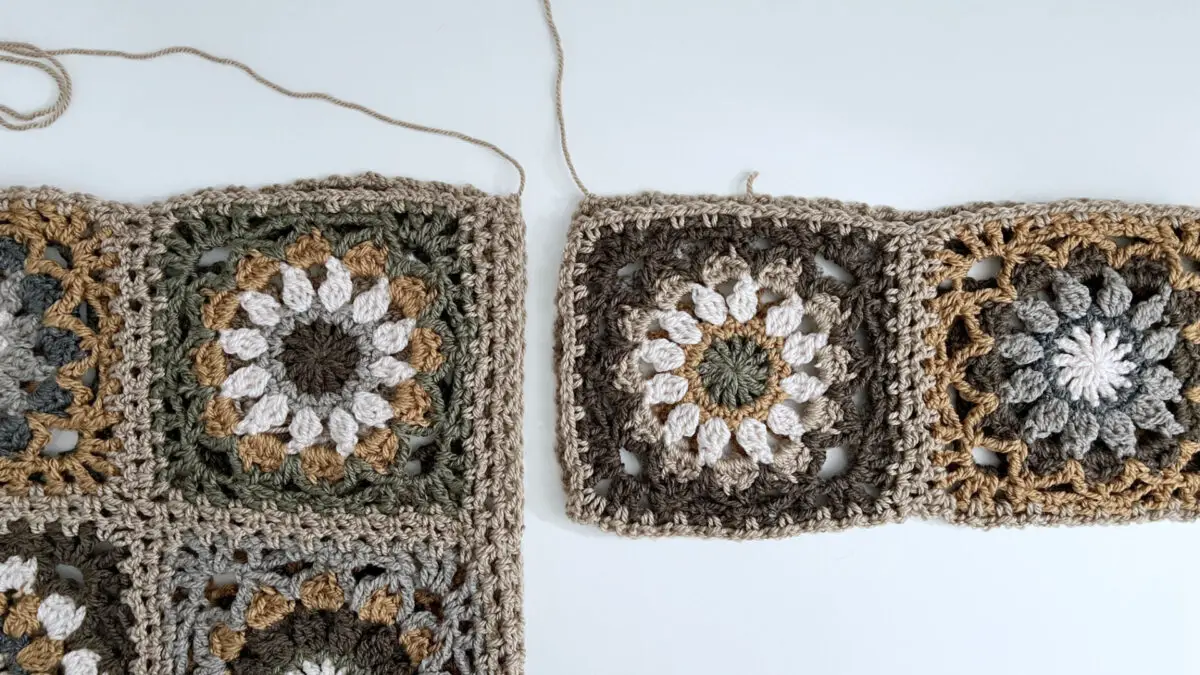
Join As You Go Tutorial
Follow the Step by Step Video Tutorial Below to Join your squares – using the diagrams as guides for repeats
S / M / L – Front, Back & Sleeve ( all sizes ) JAYGO Diagram
XL / 2XL / 3XL – Front & Back JAYGO Diagram
Watch the First Video for the JAYGO Join
Order of Sweater Assembly is as follows:
For Full Instructions See Video Tutorial – Eclipse Sweater Part 2 below
Side Panels
For Size S /XL – No Side Panels, proceed to Side Seams
Size M / L / 2XL / 3XL ONLY
work side panels on either side of Back and Front
Side Seams
Measure 6″ down from Neck Edge, place marker on sides of Back and Front. Sew Back to Front from Lower Edge to Marker for Side Seams
Lower Body Panel – All Sizes
with RS facing and starting in ch-sp beside side seam, work around entire sweater
Sleeve Assembly
Fold Sleeves in Half so fold runs along underarm. Sew Sleeves into 6 inch space for Armholes, leaving open along top shoulder edge.
Shoulder / Neck Panel
Worked across both Sleeve and Body Section back and forth in rows
Mark for Neck as follows: Measure 23 ( 24, 25, 25 ½, 26 ½, 27 ½ )” from Cuff of Right Sleeve, along Shoulder Edge, place a marker for Right Neck Edge, repeat for Left side.
Neck measures 11 ( 11, 11, 12, 12, 12 )” between markers
Shoulder Assembly
Join Front to Back using JAYGO method from cuff to neck markers. on each side
Finishing
Weave in all ends and block gently to shape.
Check out my Shop where I regularly release new patterns using all my squares.
All shop patterns include a symbol chart version of the square as well as various colour way diagrams
Thanks for joining me and getting creative. ~ Jane ~
“I found I could say things with colour and shapes that I couldn’t say any other way – things I had no words for.” – Georgia O’Keeffe
Shop the Pattern Here